CV-applied pattern extraction of soft sweat analyzing pad on Android
Category: Computer Vision, C++, Java, Android
Goal
The goal of this project is to port the previously built pattern recognition project onto android platform. The program is a mixture of Java, C++ and OpenCV.
Please refer to the link below if you are interested in my previous work, the Stage 1.
Stage 2
System Requirements
Android Phone with Android ver. 5.0 or Higher
Rear camera supporting resolution 1920x1080 100MB or more space to install the package
(Tested on: Pixel2, Samsung Note 4 and OnePlus 5)
Hardware Setup
In order to have stable exposure and white balance, extra lighting is expected. In this project, I chose external LED lighting (from an iPhone 6s or from a desk lamp) instead of the built-in flash light because the position of the flash is too close to the sample and it causes over-exposure. In the future, the development of a mounted lighting paired with the program is necessary.
Installation
As long as the package is downloaded, users can build and install the apk with Android Studio.
Software Design
Android/Java
The Java portion is responsible for the camera control, external storage access and user interface.
The User Interface
At the first time opening the program, two pop-up windows would show and ask for permission using camera and storage. Once the user agrees, a preview mode would show as in screenshot below.
The user should align (roughly) the test pattern with the blue rectangle, make sure the tiny circles aligned with the long sides of the blue box, check if the focus is correct and press the capture button for the analysis process to begin.

Once the analysis finished, a pop-up in the center would show to provide the average saturation value of this analysis. Another pop-up at the buttom indicates the path and the file name of the unprocessed image file. The image is stored in the folder named as the program.
If the reading is not as expected, the user can refer the image stored in the root folder of the storage. The file has the same name of the image file in the application folder except with a prefix of the saturation reading. In the image, the user is able to see where the program extracts reading.
Occasionally, there could be no detections at all. If things like this happen, the pop-up in the middle would show No test area recognized to remind the user to recapture.
The layout is with RelativeLayout to ensure the position of the buttons doesn’t change on phones with different resolution. The blue rectanle is however needed to be adjust to fit the phone. It is not due to the resolution but due to the different minimum focus distance of the camera used. The setup in this program should work on most phones.
Once the CAPTURE button is clicked, two pop-up windows would show. One in the center indicates the average saturation value of the test area it captured. Another is the location and the file name of the stored image. Please note there are two images being stored. Both are under the application sub-foler in the Gallery folder. Users can check both of the images and retake if the features are not well-recognized or the picture is blurry or shaded.
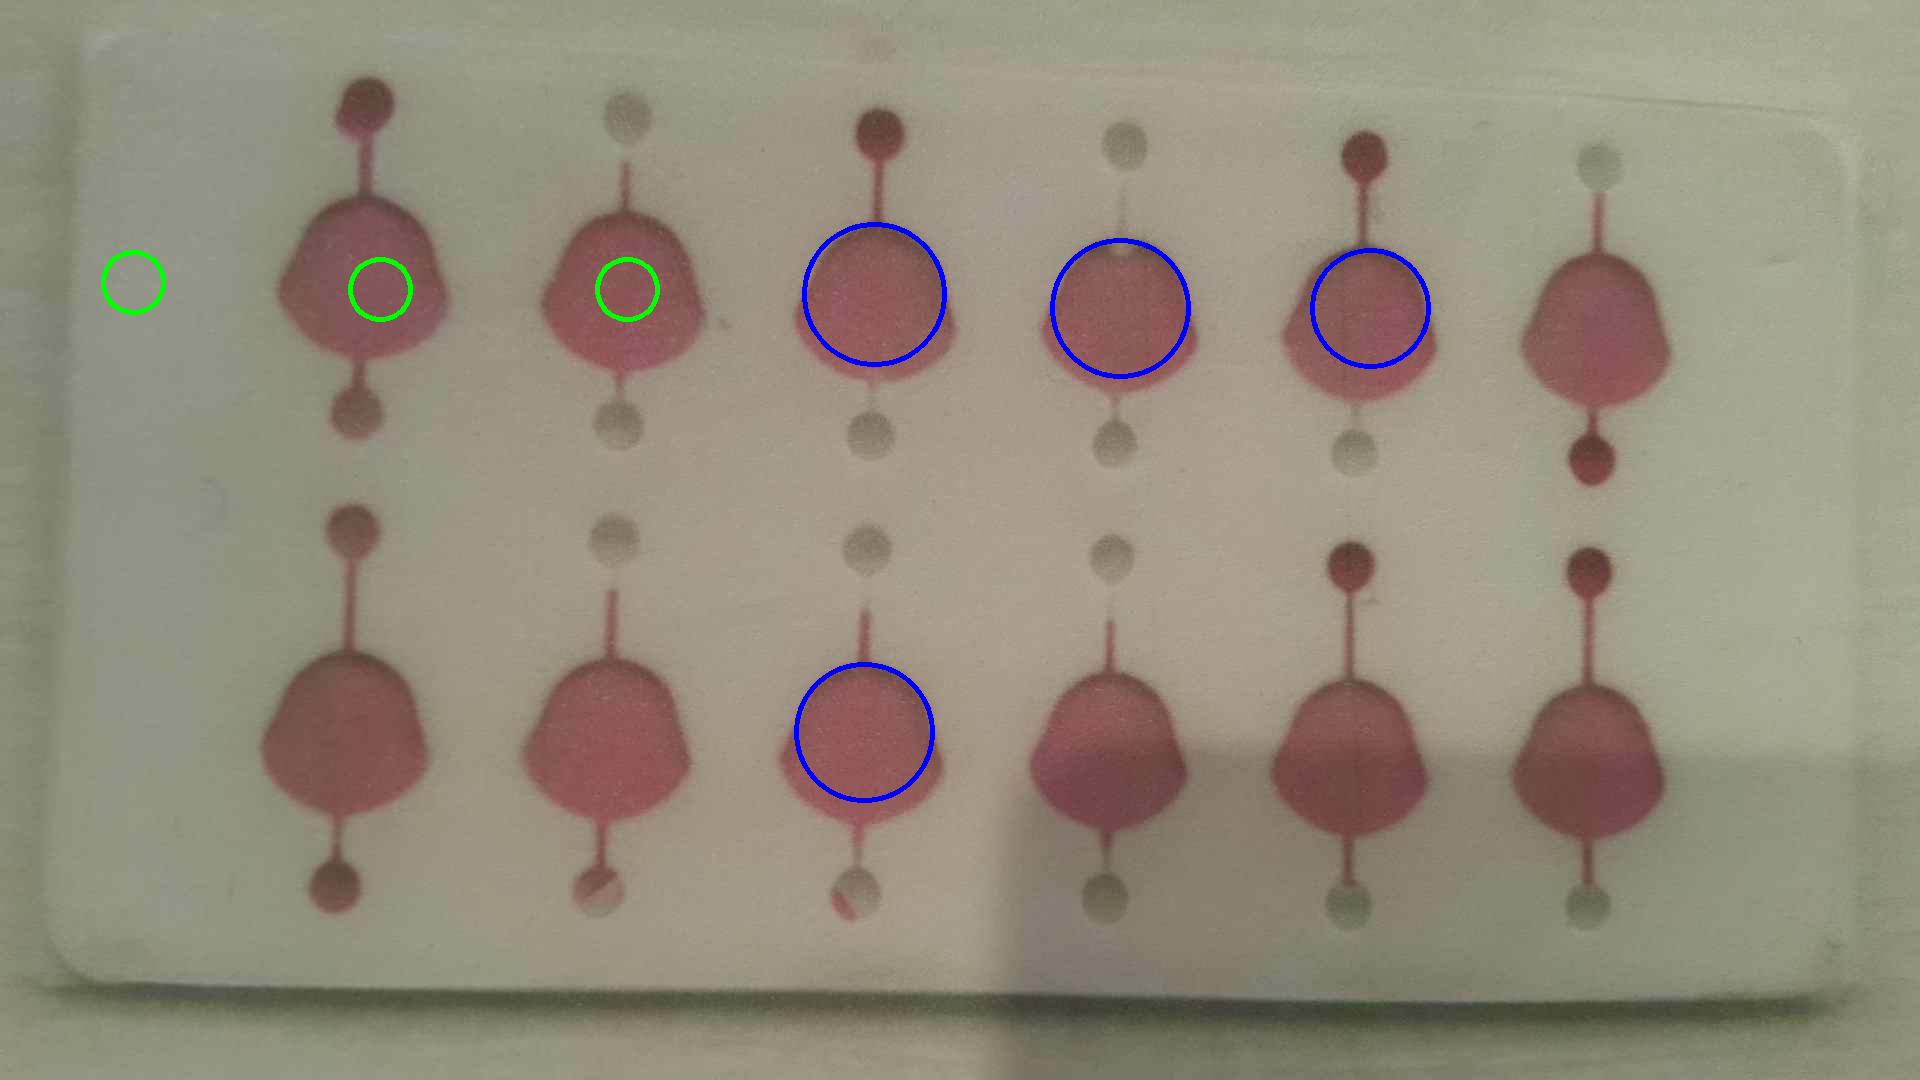
Below is a demostration of how a picture with false detection look like. One of the circle is not within the test area. When a detection like this shows, it is suggested that the user to redo the capture.
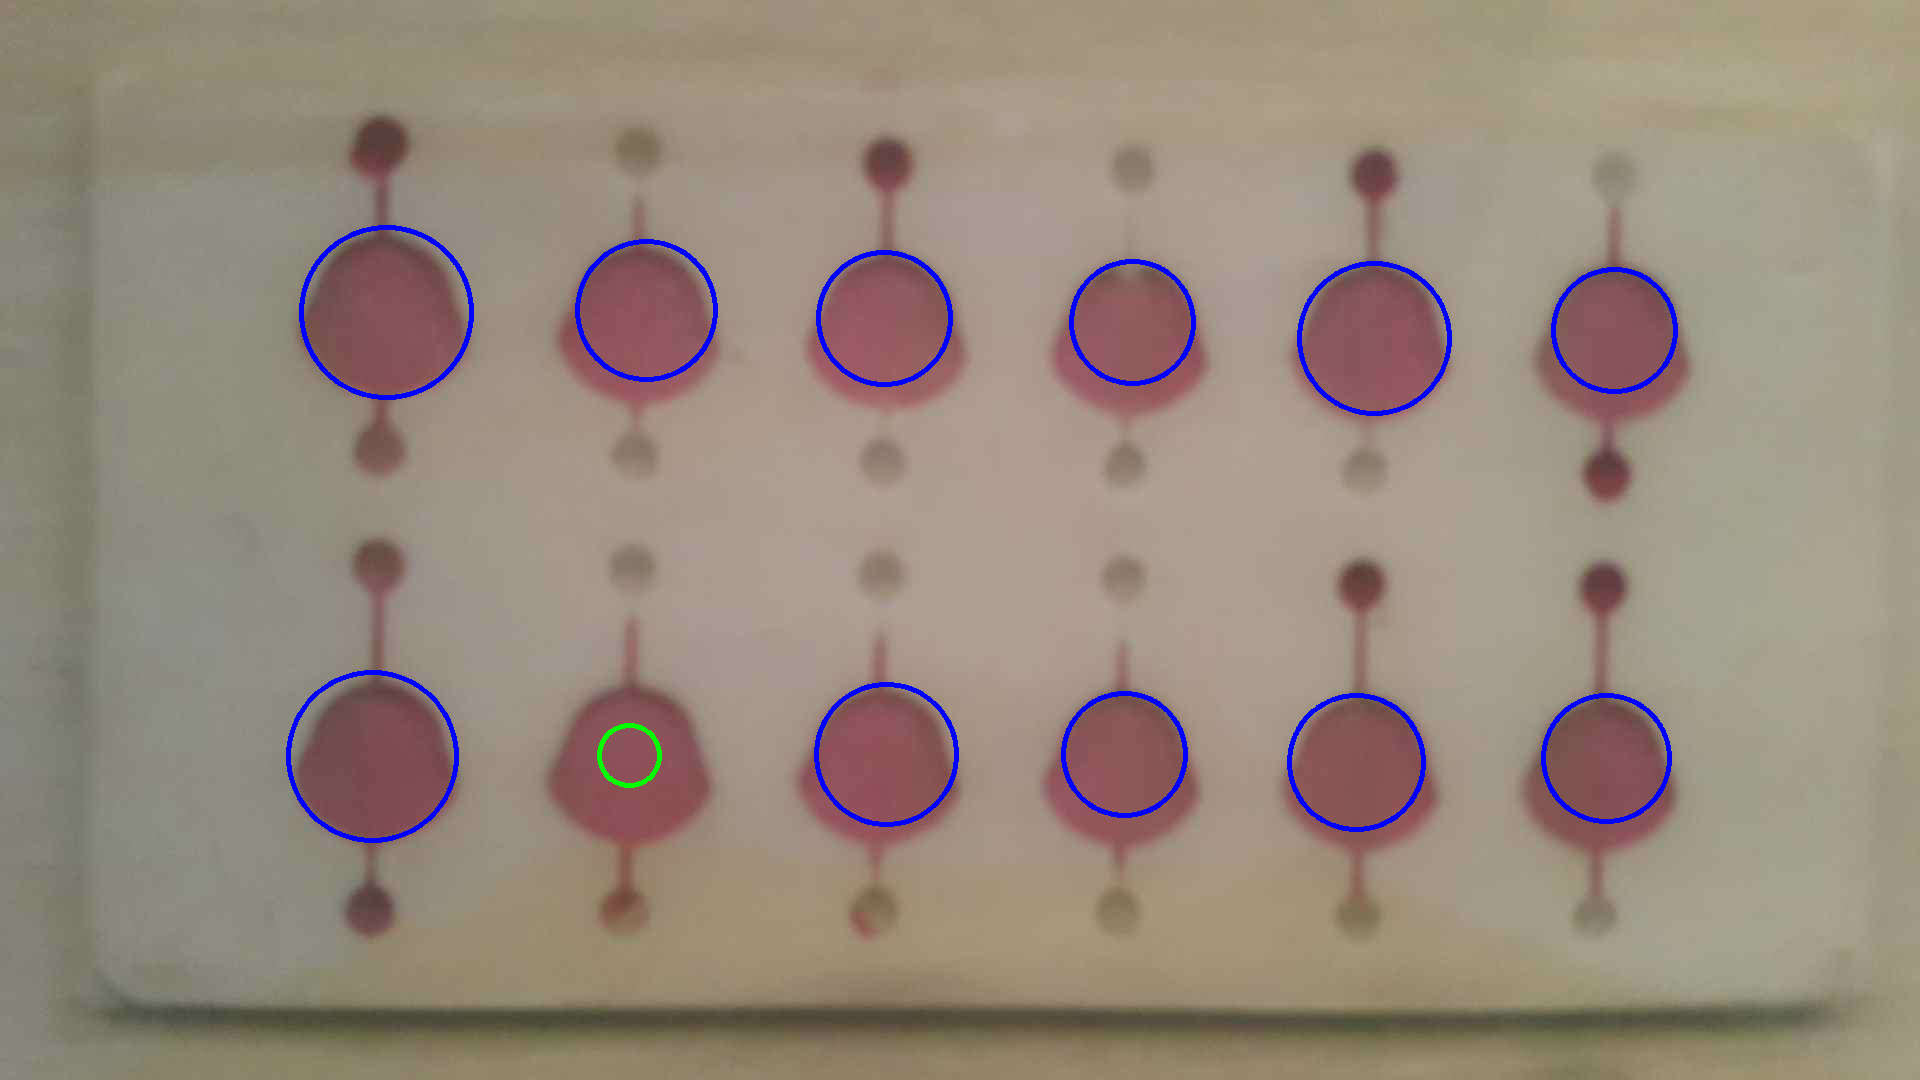
A good detection is as illustrated below where all the circles are within the test areas.
The Camera2 Package
From API 21 (ver. 5.0), the new camera2 replaces the camera package. The core function is the same. In the program, I locked the capture resolution to 1920x1080 to save the bandwidth and to shorten the processing time. Also, the resolution should work on most of the phones. In the takePicture function, we look for the preset and output an error log if the preset is not within the supported resolution list.
CameraCharacteristics characteristics = manager.getCameraCharacteristics(cameraDevice.getId());
            Size[] jpegSizes = null;
            if (characteristics != null){
                jpegSizes = characteristics.get(CameraCharacteristics.SCALER_STREAM_CONFIGURATION_MAP)
                        .getOutputSizes(ImageFormat.JPEG);

            }
            if (jpegSizes != null && jpegSizes.length > 0){
                for(int i=0; i<jpegSizes.length; i++){
                    if (jpegSizes[i].getWidth() == width && jpegSizes[i].getHeight() == height){
                        break;
                    }
                    Log.e("ResolutionError", "Failed to find the target picture resolution");
                }
            }
The auto exposure was set to ON in this program and the flash is set to OFF since we use external lighting.
captureBuilder.set(CaptureRequest.CONTROL_AE_MODE, CameraMetadata.CONTROL_AE_MODE_ON);
captureBuilder.set(CaptureRequest.FLASH_MODE, CameraMetadata.FLASH_MODE_OFF);
After capturing the image, I convert the buffer to bitmap to store and to convert again to cv::Mat format fo C++ function to manipulate. Once the C++ function finish its work. We then display the detection result in the center by calling the toast. And, we convert the cv::Mat back to bitmap and store both the raw image and the modified one. The opencv matToBitmap function and the store_img helper function do the trink in takPicture function.
JNI and C++ Part
In Java, I can not pass the Mat directly. In stead, JNI allows us to pass the address of the Mat to C++. So, here we use getNativeObjAddr() to pass the address to C++ function. There are some helper functions to do the format conversion. You can refer to the source code listed in the bottom for details.
The c++ function is matProcessing, it takes the address of the Mat, and a boolean value of which mode it is with. The return value of the function is the average saturation value it collects.
satReading = matProcessing(imageGrab.getNativeObjAddr(), switchKey);
Most of the C++ function is the same as in the stage 1 except there is no color checker in the demostration so the calibration target is the pad itself. Originally, we store the images on the computer. On the android, we have the java part to use the buffer to store the image. Another modified Mat with features marked is stored back at the same address the JNI passed into C++.
OpenCV and CMakeLists.txt
To have the Android working with OpenCV, we need opencv-android-sdk. And, to work with C++, at the time creating project, be sure to check C++ support.
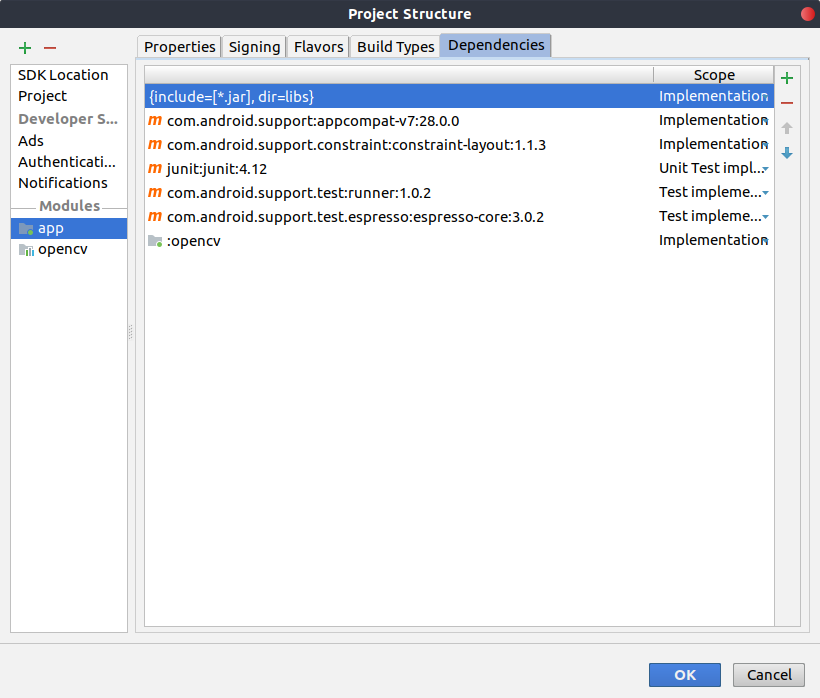
My way making this project working with OpenCV is to import the OpenCV into the project and adding it to the app dependencies.
In the app/src/main folder, create a jniLibs and copy the ABIs folders located in the /sdk/native/libs parent folder inside opencv-android-sdk. This is to build the code for corresponding ABIs. For example, the Samsung note 4 is armeabi-v7a. During cmake, the program looks for corresponding library in these sub-folders.
the android studio supports cmake so I can modify the CMakeLists.txt to add OpenCV support. The modification includes set include directories, add_library, set lib_opencv property.
include_directories(WHERE THE OpenCV-android-sdk/sdk/native/jni/include LOCATES)
add_library( lib_opencv SHARED IMPORTED )
set_target_properties(lib_opencv PROPERTIES IMPORTED_LOCATION ${CMAKE_CURRENT_SOURCE_DIR}/src/main/jniLibs/${ANDROID_ABI}/libopencv_java3.so)
Calibration/Performance
In this project, I don’t have the real samples to make the calibration and to fit the curve. Instead, I have the scanned digital pictures. So, the performance evaluation is based on the reading from printed pictures. (Here is the link to the folder of the images been processed.)
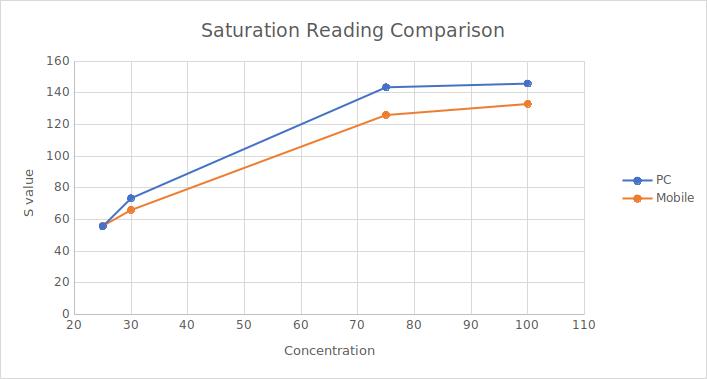
As illustrated below, there isn’t reading of 10mM due to reading not available with the mobile app. I also disabled the white balance/contrast enhancement function (simpleCB) to prevent overkill due to lower dynamic range. As you may find in my code, the exposure control is done by fixing the ISO and the exposure time. The white balance is control by the stable external lighting.
captureBuilder.set(CaptureRequest.SENSOR_SENSITIVITY, isoValue);
captureBuilder.set(CaptureRequest.SENSOR_EXPOSURE_TIME, exposureTimeValueInMilliseconds);
From the reading, we see that as long as we have a stable light source, we have roughly the same trend on the PC software and the Android application. One thing to note is that the mobile is not noise-proof, which means to get a proper reading, one might need to take a few shots to make sure. Plus, the mobile app doesn’t work with lower concentration.
Once I have samples with better resolution, for example, 5mM delta between each, I can evaluate the linearity in more detail.
Application
Considering the use cases are normally not in lab environment, plus the sample we have are not with fine resolution, the linearity is not guaranteed. Thus, I would suggest to use the application as a reference but not as an instrument at this moment.
To-Do
On the note 4, there are several open issues to be dealt with:
-
There isn’t permission window pop-up first time executing this program. The program still has the permission to access the camera and the storage. However, it uses the internal storage instead of the external one. this issue doesn’t show on the OnePlus phone and the pixel 2.
-
The image stored don’t show up before restart. This is related to the issue 1. To access the image in the photo or the galary app, a restart is necessary. Otherwise, one can access the image in the built-in explorer app.
-
Long capture gap: After taking a picture for analysis, the program captures the image and stores it. It then calls the creatCameraPreview function to return to the preview mode for next capture. However, it takes long time for the program to clear the cache and move back to the preview mode. If users face this failure, suspend/resume cycles solve this failure.
In order to support different features, I also plan to add a function so the users can draw a custom overlay, crosshair for example, to guide the program where the features locate. This can further prevent false detection and improve the accuracy.
The Package
If you are interested in the details of this application. Here is the link to this project. The OpenCV folder is removed due to size consideration so you need to add the module back to the project. If you want to try out this apk, the link to this apk is here. Feel free to contact me with any question.